

Proper lighting is important to keep in mind when installing security cameras. In an ideal world, the lighting in a security camera’s field of view would be perfectly even and properly exposed. But in the real world, we can’t always control the way light interacts with our scenes. If you find yourself in a situation where your security camera’s footage contains areas that are either too dark or too bright, there are some settings that you can adjust to end up with a cleaner and more detailed image. In this blog post, we’re going to talk about three of these settings: BLC, HLC, and WDR.
BLC, HLC, and WDR are three settings that affect the way a security camera adjusts the exposure of the image. BLC and HLC compensate for uneven lighting via digital adjustments, whereas WDR uses the camera’s hardware to provide even lighting across the scene.
Let’s break down each of these settings and talk about when you might need them and how to set them.
What is BLC and HLC and When Should You Use Them?
BLC and HLC are almost like two ends of a spectrum. Between these two settings, you can easily adjust the exposure of just about any scenario.
Backlight compensation (BLC) is a setting that allows you to choose which areas of your scene should be properly exposed instead of letting the camera choose for you.
More often than not, cameras like to automatically adjust exposure based on what it thinks is the primary scene. But the camera is not always right.
Sometimes your camera may try to bring brighter areas into proper exposure, like a window or the sky, by bringing down the brightness. In the process of exposing for those brighter areas, the camera would also be darkening other areas of the scene.
By enabling BLC, you’re telling your camera to over-expose the brighter parts of your image in order to properly expose the darker parts. Check out the two images below to see the difference that BLC makes. In the first image, the camera was automatically adjusting the exposure to compensate for the bright window in the background, and everything else is way too dark. In the second image, turning on BLC allows us to tell the camera that we want the darker parts of the image to stay properly exposed. Notice that even though we can now see the inside of the room much better, the windows have now been totally blown out.

Default Image
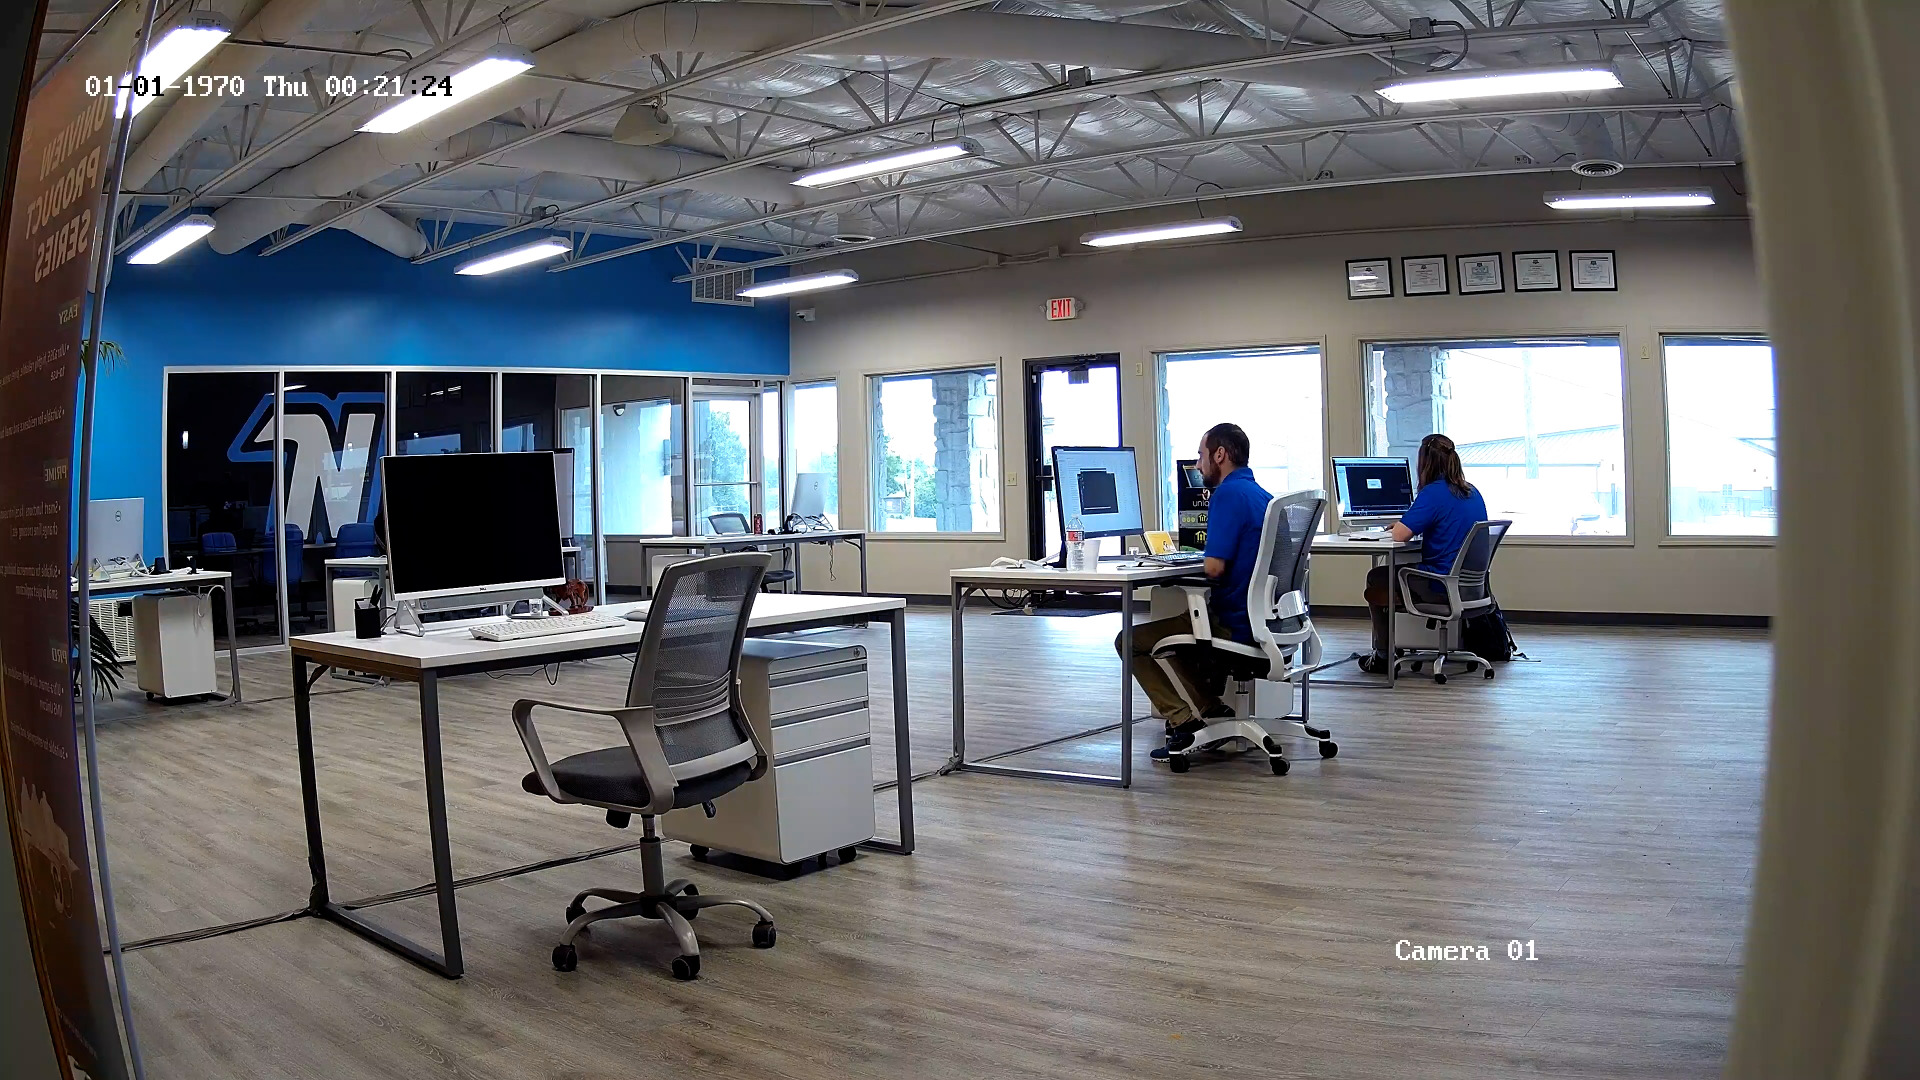
Image with BLC Enabled
Highlight compensation (HLC), on the other end of the spectrum, is a setting that allows your camera to compensate for brighter parts of your image, maintaining detail in brighter parts of the image that would otherwise be blown out.
You might find yourself in a situation where there are very bright lights in your camera’s field of view that causes parts of the image to be blown out. Think of car headlights shining at your cameras. When the camera is properly exposed for your scene, bright headlights would cause the image to become overexposed, resulting in missed information.
When you enable HLC, the camera will take bright spotlight-like areas into consideration and adjust the exposure accordingly. With HLC, your camera will try to properly expose your entire scene while reducing the brightness of the highlights. Check out the images below to see the difference between a standard security camera image and a the same scene with HLC enabled. In the first image, the license plate is completely unreadable due to the reflective surface of the plate. In the second image, the plate is much more legible.
Enabling HLC and BLC looks different depending on the manufacturer of your security camera. At Nelly’s Security, we have three main brands of video surveillance products. Here’s how you can enable these settings on our three different cameras.
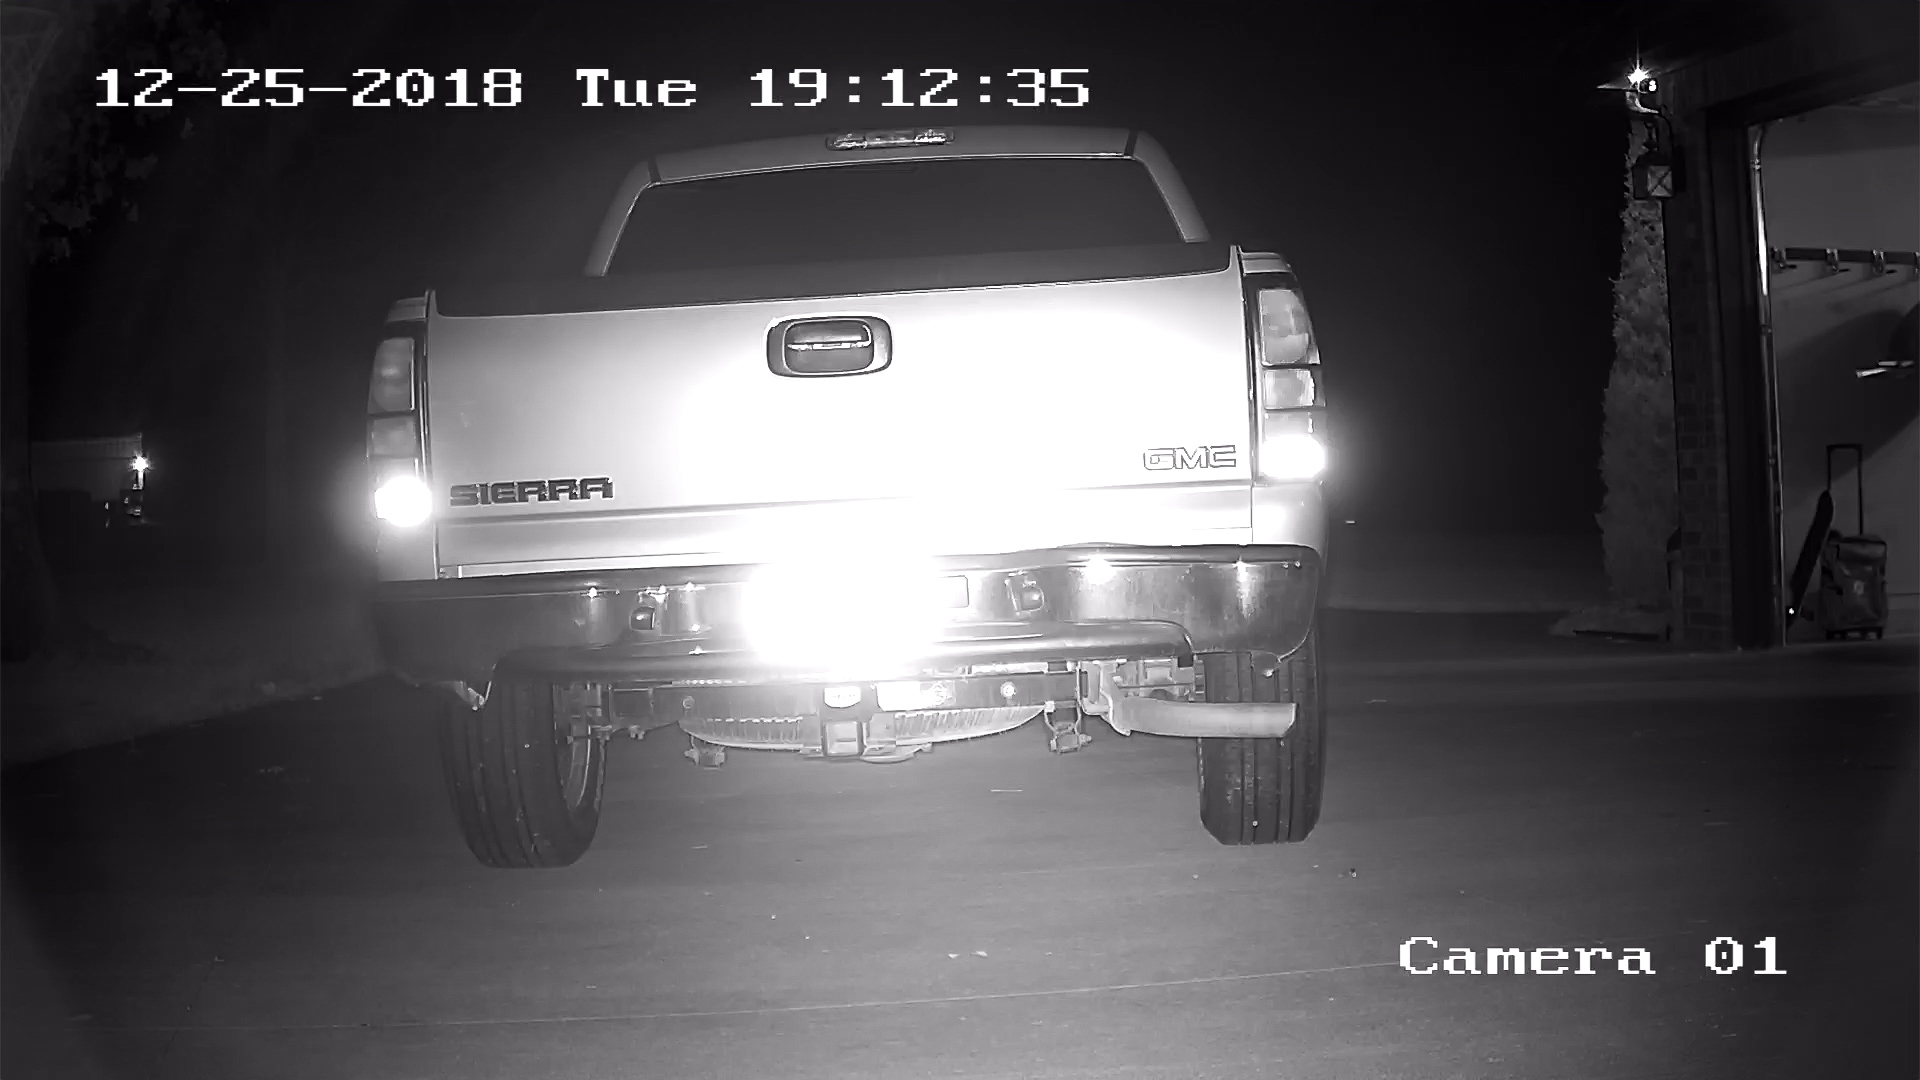
Default Image
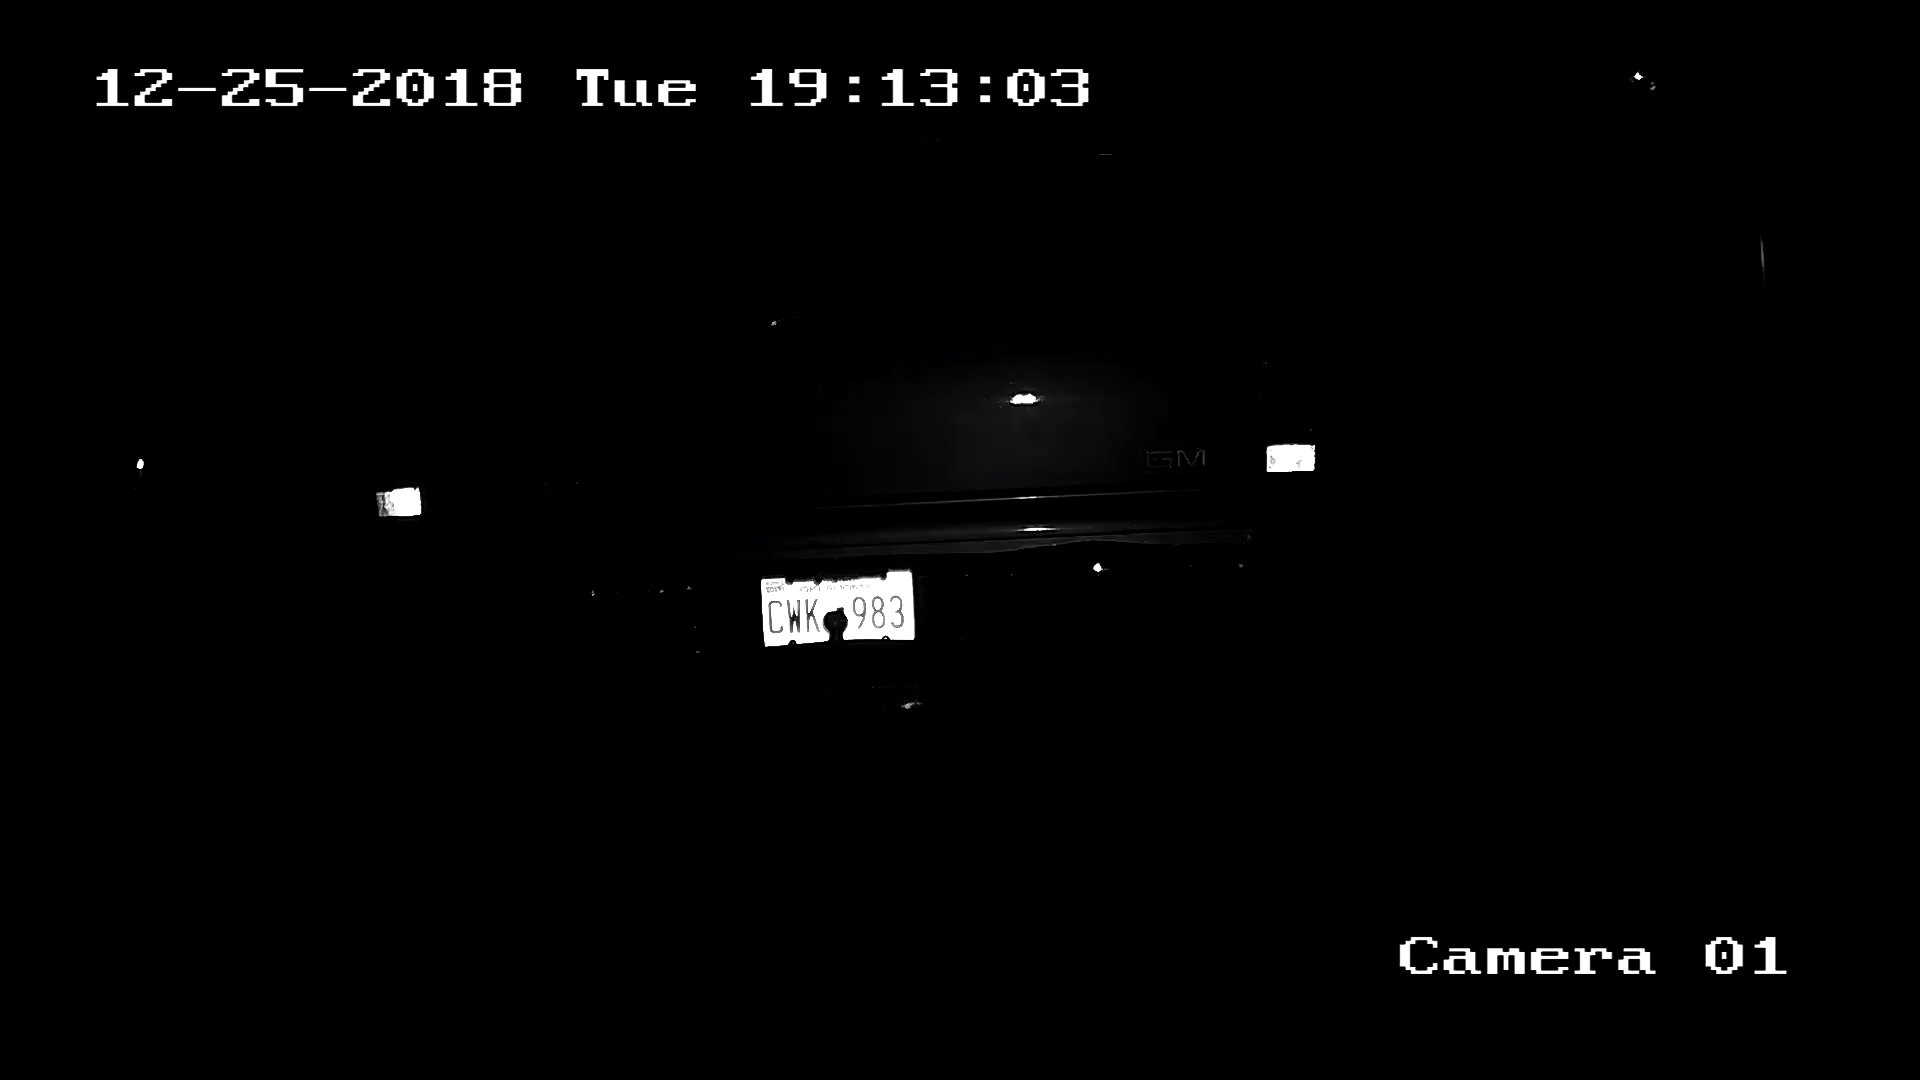
Image with HLC Enabled
BLC and HLC on H-Series Cameras
Our H-Series cameras support both BLC and HLC. To access these settings from the web interface, navigate to configuration > image > backlight settings.
You can enable BLC by changing “BLC Area” to “Auto.” You can also manually set the BLC area by selecting an area to prioritize. If you select “Custom,” you can draw a square around the part of the image that you want to be properly exposed.
To enable HLC, simply toggle the HLC setting from “OFF” to “ON.” Once it’s turned on, you’ll be able to adjust the strength of the HLC.
BLC and HLC on R-Series Cameras
For our R-Series cameras, both BLC and HLC are simple toggles that can be turned on or off. There are no additional settings to adjust for either option. To enable these settings from the Camviewer program, navigate to remote settings > display > image control.
BLC and HLC on Uniview Cameras
Unlike H-Series and R-Series, Uniview groups both BLC and HLC into one setting, simply called “Compensation.” On some models, this is oversimplified with the label “Backlight Compensation.”
Rather than a toggle, this setting is a slider. By default, the slider is set to 0, which is directly in the middle. If you increase the slider, you will be increasing the brightness of the image, essentially adjusting backlight compensation. If you decrease the slider into the negative numbers, you will be decreasing the brightness of the image, adjusting highlight compensation.
To adjust the compensation for your Uniview camera, log into the web interface. From here, navigate to setup > image > image > exposure settings.
What is WDR and When Should You Use It?
WDR is similar to BLC and HLC, but most times produces higher quality results. Not all cameras support WDR, because it requires two image sensors instead of one.
Wide dynamic range (WDR) uses two image sensors to capture the same scene at two different exposures. Images produced by WDR sensors can have proper exposure on both the darker and lighter parts of the image, giving more detail across a wider dynamic range between the shadows and highlights.
Since BLC and HLC are just adjusting the exposure of a single sensor, making the image either brighter or darker, the dual-sensor technology of WDR cameras are far superior, since they are capable of producing the results of both HLC and BLC settings at the same time.
Consider the images below. The first image is the default scene, where the exposure is set based on the window. The second image is what it looks like when BLC is enabled. The rest of the room is much brighter, but the window has been completely blown out. With WDR enabled, the image now has leveled exposure from top to bottom, showing beautiful detail in both the window and the rest of the room.
WDR is great for scenes like this, when you might want to record information happening in both the shadows and the highlights of your image.
Default Image
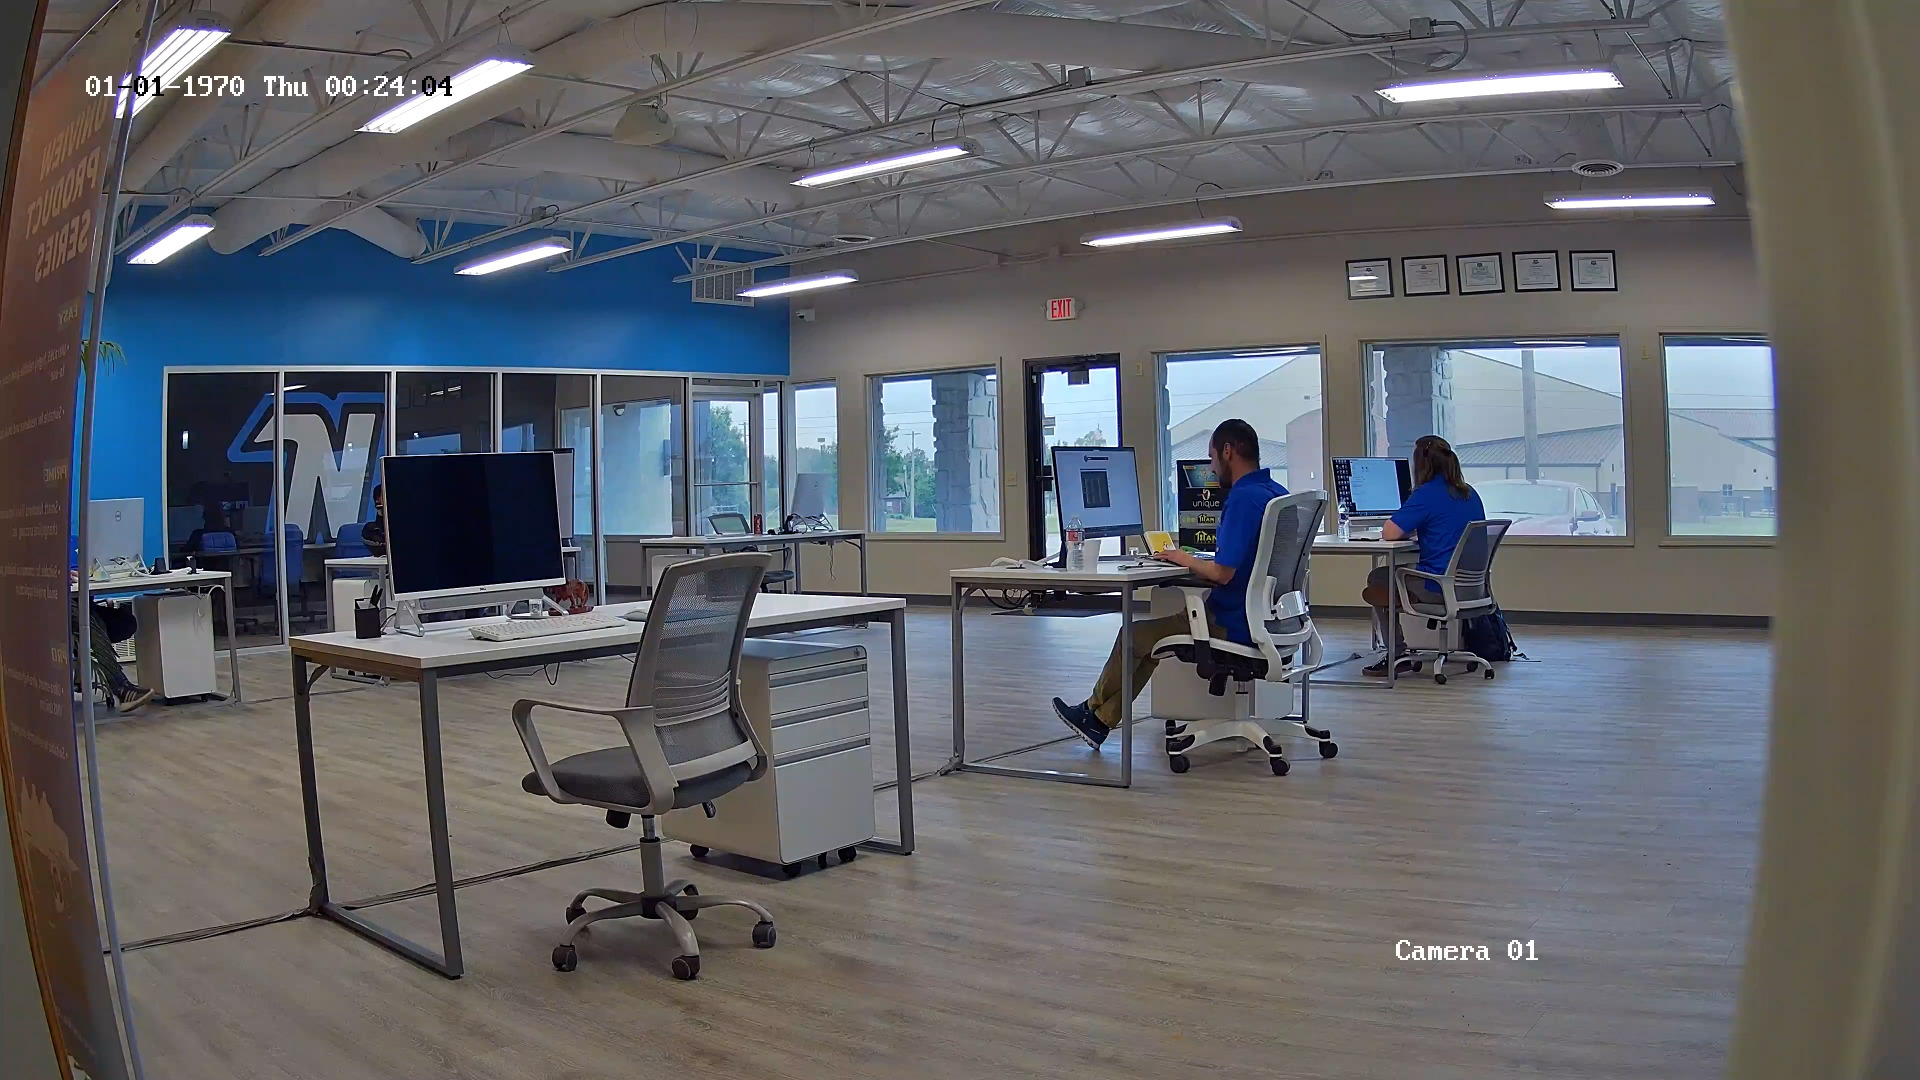
Image with WDR Enabled
Many of our H-Series and Uniview cameras have Wide Dynamic Range features available. If your camera does have WDR, you’ll find the setting in the same section of the web interface as the HLC and BLC settings: configuration > image > backlight settings for H-Series cameras and setup > image > image > exposure settings for Uniview.
You can either turn WDR to “On,” “Off,” or “Auto.” When set to auto, the WDR setting will turn itself on and off as needed. This is ideal for a scenario when the lighting is only uneven during a certain time of day. For instance, you have windows facing east and you really only need WDR in the morning when the sun is pouring into the room.
If WDR is turned on or set to auto, you can also adjust the strength of the WDR. The higher the value, the less contrast there will be between the dark and light images. Adjust this setting sparingly, as the higher the WDR, the lower quality footage your camera will produce.
What is the Difference Between True WDR and Digital WDR?
Since Wide Dynamic Range requires certain hardware inside your camera, not all cameras are capable of producing a WDR image. However, there are some cameras that try to reproduce the same results digitally. Digital WDR (dWDR) takes a single image sensor and digitally reduces the contrast between the light areas and the dark areas, providing more details across the dynamic range. However, since this is all done digitally, the results are not nearly as good as true WDR. It’s a good compromise when you’re in a pinch and need just a little bit more leveled lighting in your scene. But if you know you’re going to be installing a camera in a setting where you’ll need to take advantage of WDR, make sure you find a camera that actually does have true WDR and not digital WDR.
Our R-Series cameras do not have true WDR, but they do have the option to turn on dWDR if you need to. Do do this, navigate to remote settings > display > image control and enable the “dWDR” setting.
Final Thoughts
Often times, you can pull a security camera out of the box, plug it in, and never tough it again. But every once in a while you’ll find yourself in a situation where the default settings just don’t produce a very good image. If your image is less-than-ideal, a lack of adequate lighting just might be the culprit. If you have uneven lighting, playing around with the BLC, HLC, and WDR settings can help you to boost your image quality and retain more details in the darker and brighter parts of your image.
If you’re still having trouble dialing in your image how you want it, fear not. If you purchased your security camera from Nelly’s Security, your purchase came with lifetime tech support included. Simply give us a call or send us an email and we’ll do


