How to Integrate an R-Series Camera with a 3rd Party Recorder

In this guide, we will show you how to integrate your R-Series security camera with a 3rd party NVR.
Sections in this guide:
Before Getting Started
Before we start, if you do not yet have an NVR to record your cameras to, we recommend our R-Series recorders. All you need to do is plug your camera into the POE switch in the back and you are done.
However if you want to use these cameras on a 3rd party NVR, here are some tips on getting it set up. For this tutorial we are going to be showing you how to do this using a Dahua and Hikvision NVR. However, the concept is the same no matter which ONVIF compatible NVR you are using, so please use these instructs as a baseline no matter what brand recorder you have.
The most important thing to look for in your NVR is its resolution capabilities. If you're using one of our R-Series 4K cameras, you'll need to ensure that your NVR can handle at least 8MP cameras. Some NVRs cannot. This is very important!
Also, some NVRs cannot do H.265 encoding. Therefore we will show you how to change the camera to H.264 encoding to ensure that it will work on your NVR. Even if your NVR does allow fo H.265 decoding, depending on its ONVIF version, it may still not accept the R-Series H.265 video. Therefore, we recommend that you do the pregame Setup before you get started.
Pregame Setup
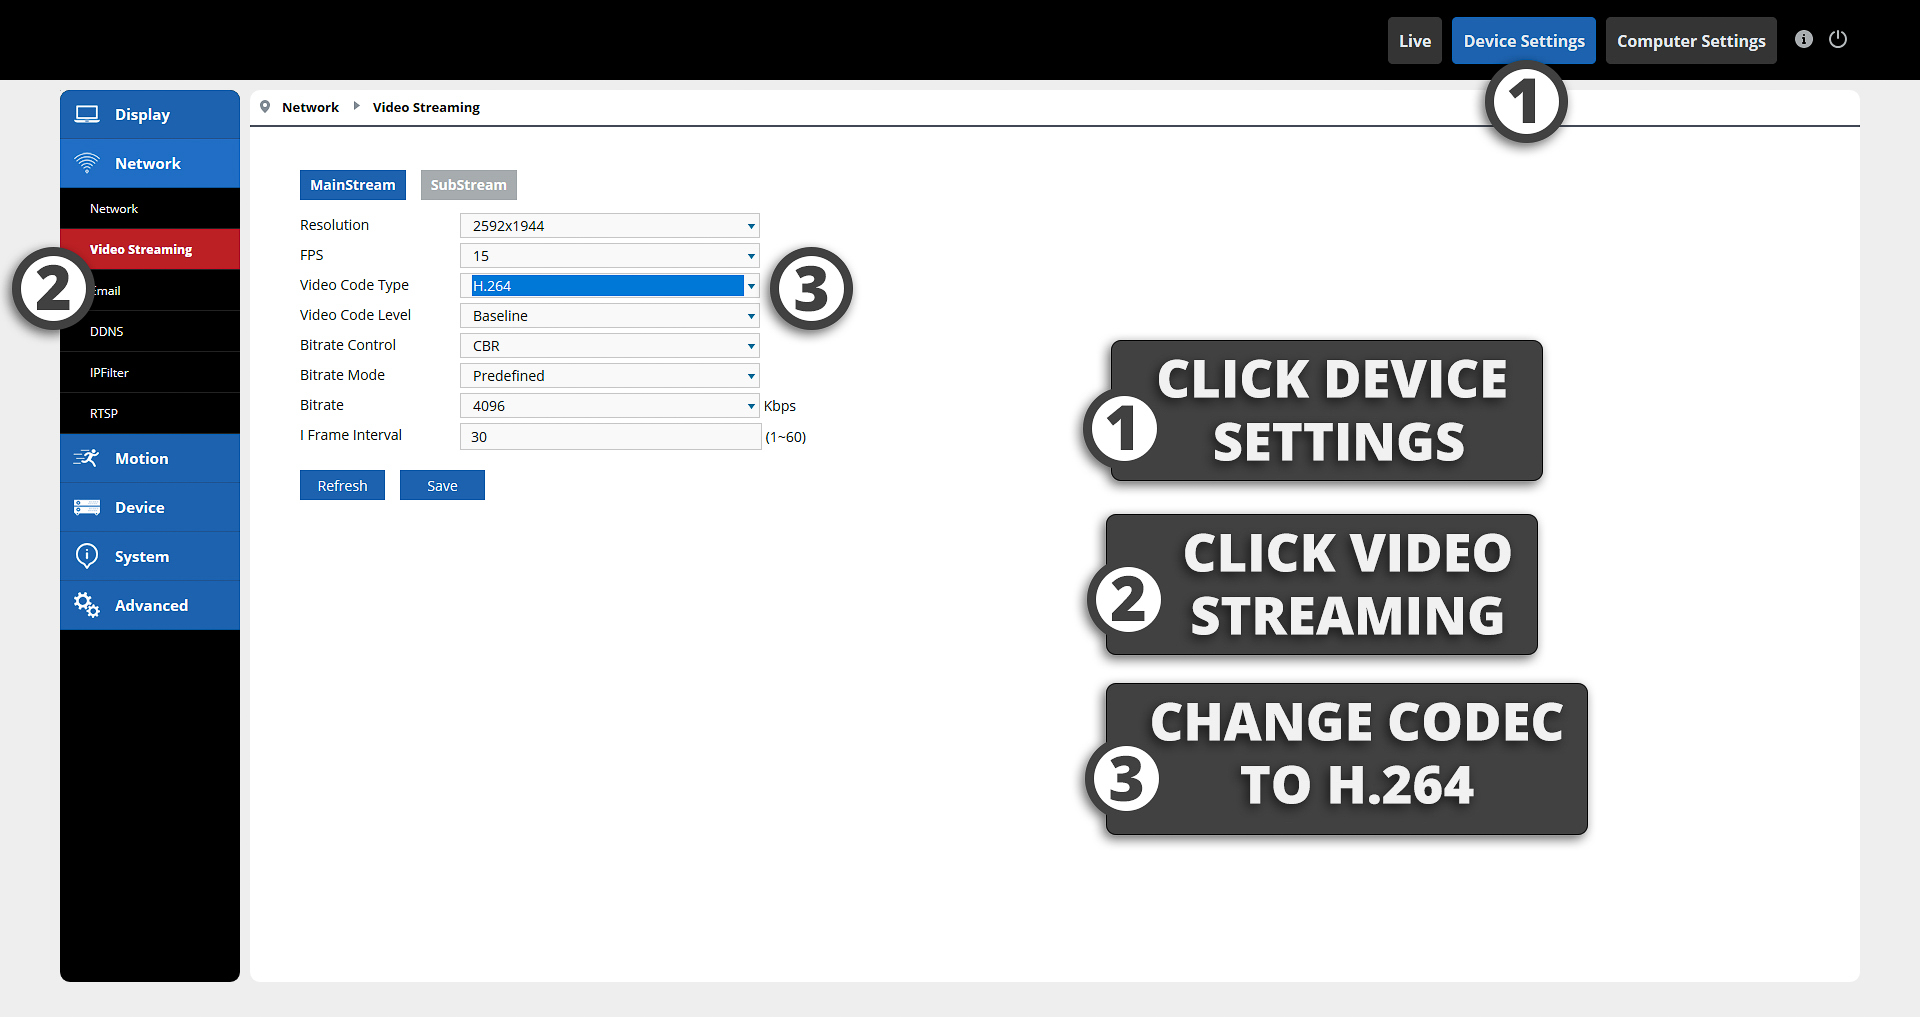
Step One: Open your CamViewer and change the encoding to H.264 within the device settings:
Hikvision NVR Integration
There are two different methods you can use to connect your R-Series camera to a Hikvision NVR. It all depends on how you have it wired.
Your Camera is Connected to a Switch that is Separate from the NVR:
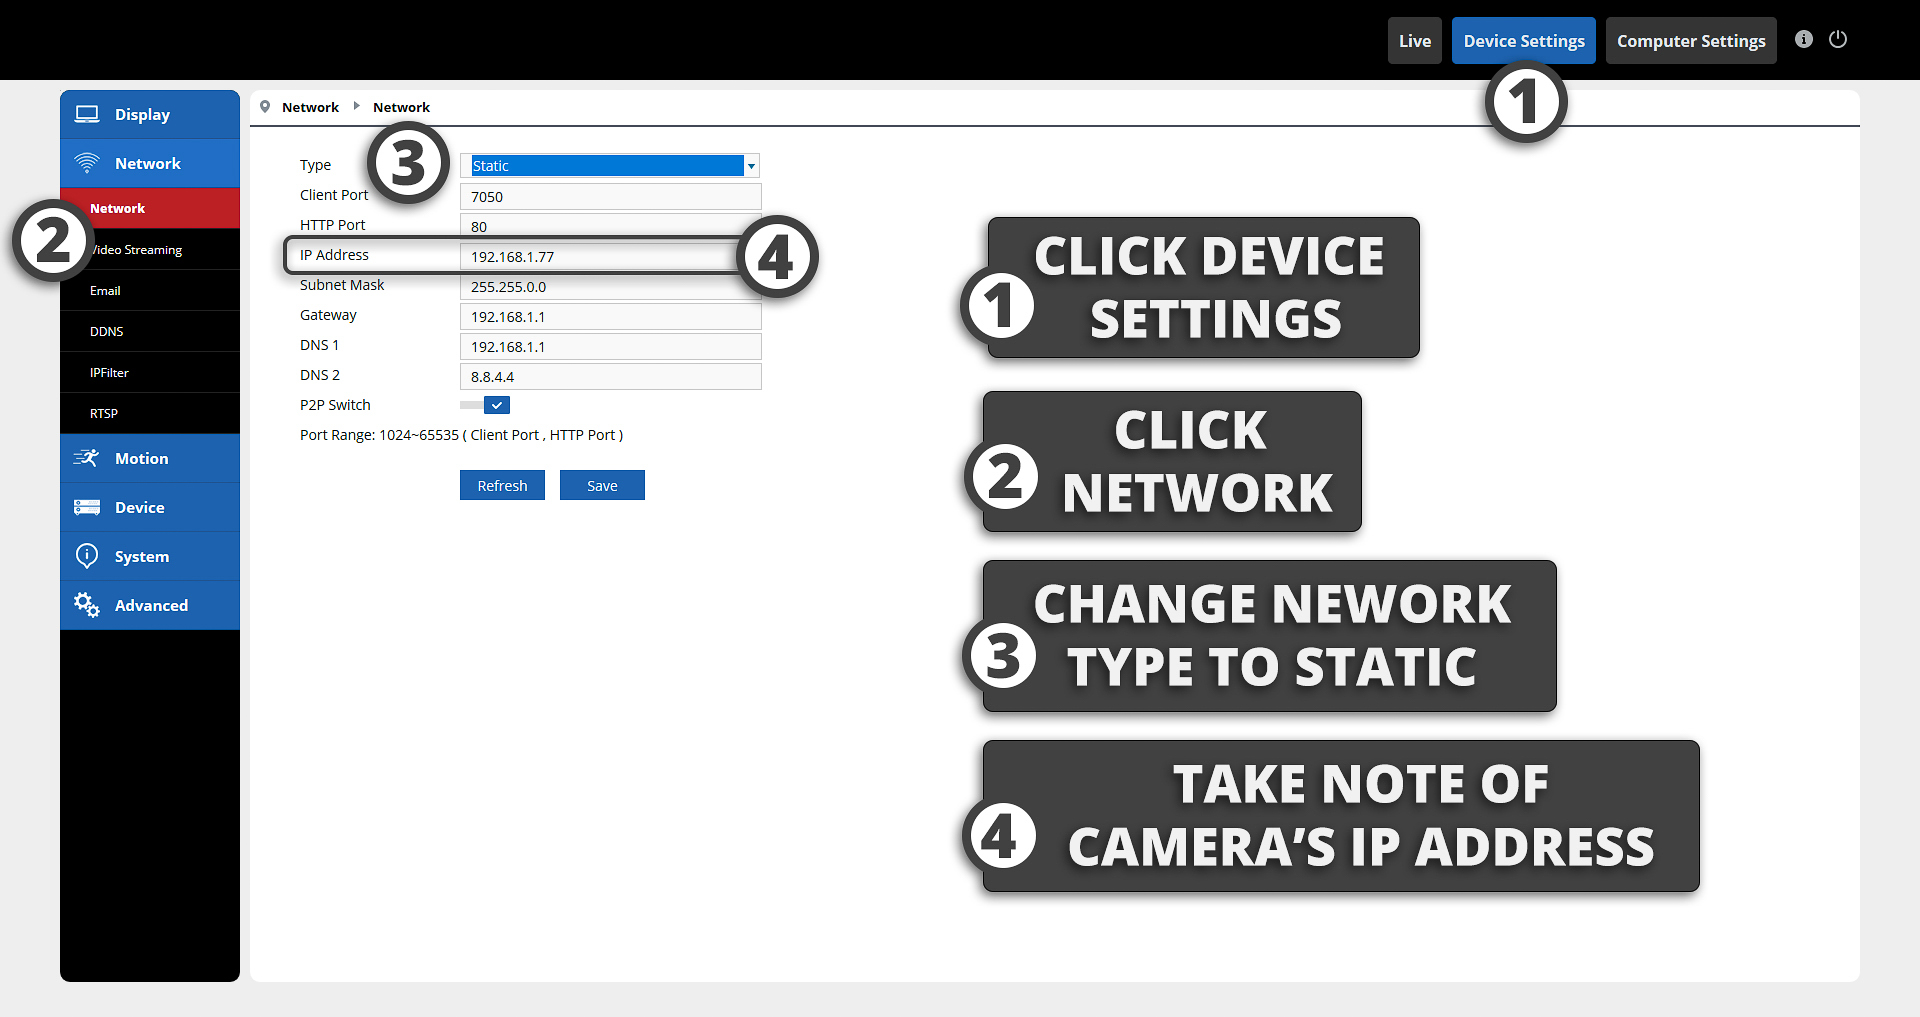
Step One: Open up your CamViewer software and navigate to the network settings under device settings.
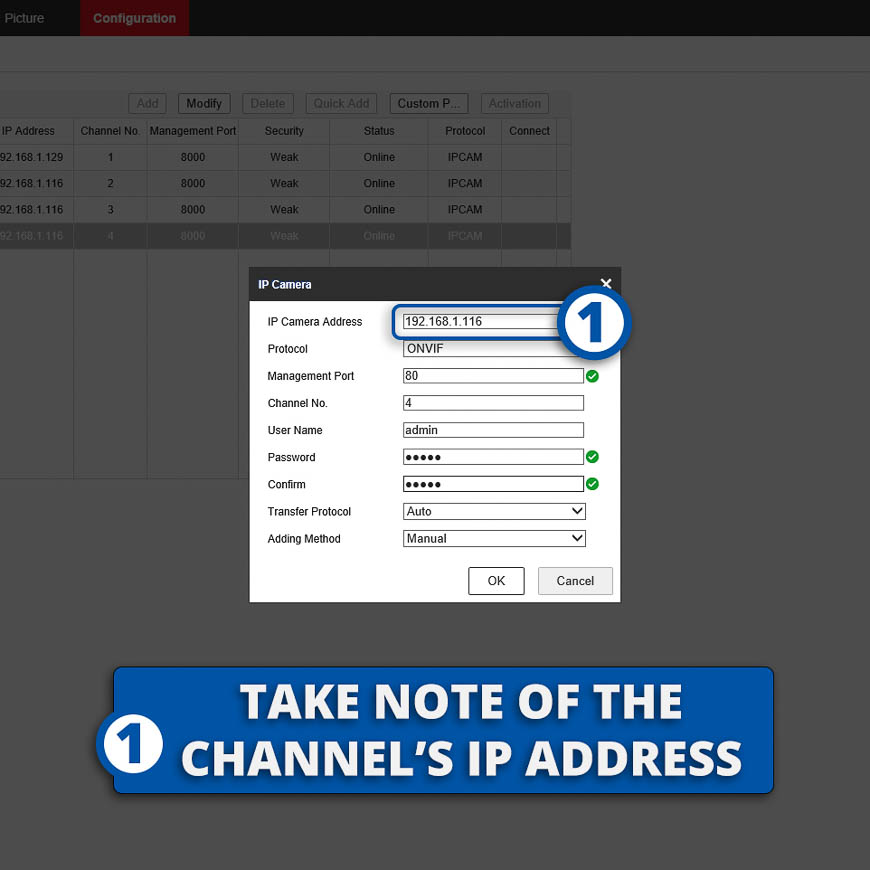
Change your IP network type to "Static." Also while you're here, take note of your camera's IP address, as you will need this whenever you enter it into the Hikvision NVR.
In our example, we'll take note of the IP address 192.168.1.77.
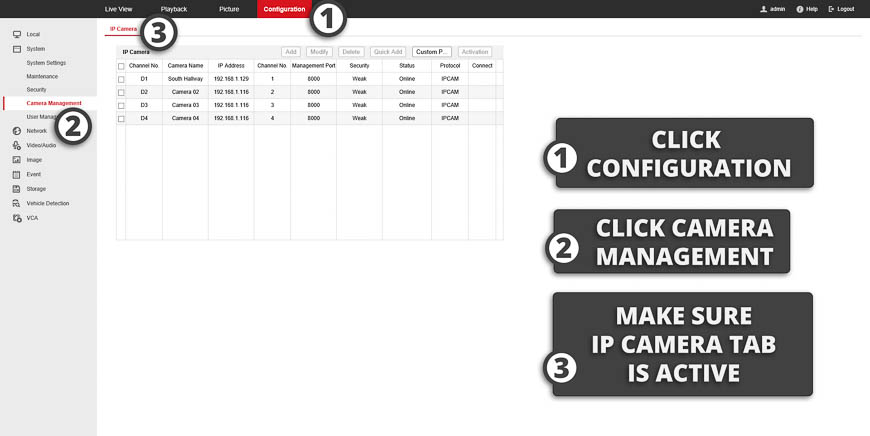
Step Two: Log into your Hikvision NVR's web interface and navigate to the Camera Management section:

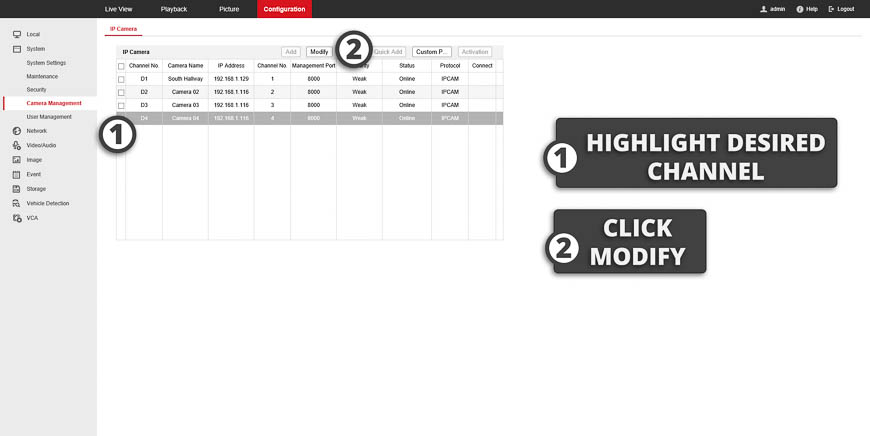
Step Three: Highlight the channel onto which you want to add the R-Series camera and click "Modify."

Change the credentials to match your cameras. You may need to first change the adding method to "Manual" in order for the rest of the fields display.
- IP Address: Enter your camera's IP Address
- Protocol: ONVIF
- Port: 80
- Channel: Desired channel
- User Name: admin
- Password: admin
- Transfer Protocol: auto
- Adding Method: Manual

Congrats! You should now see your R-Series camera on the NVR.
Your Camera is Connected Directly to the POE Switch Built Into the Back of the Hikvision NVR:
If you already have your camera plugged into the back of the NVR, temporarily remove it and plug it back into your main network via your router or a separate switch.
Step One: Log into your Hikvision NVR’s web interface and navigate to the Camera Management section:
Step Two: Highlight the channel onto which you want to add your R-Series camera and click "Modify."
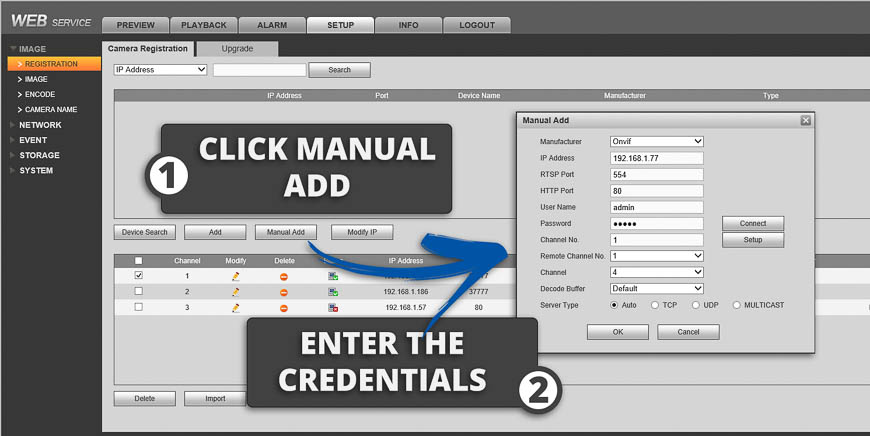
Step Three: The following screen will pop up. The first thing you want to do here is change the adding method to "Manual" in order to get the other fields to display. Be sure to enter the following credentials:
- IP Address: Don't change; take note of this.
- Protocol: ONVIF
- Port: 80
- Channel: Desired channel
- User Name: admin
- Password: admin
- Transfer Protocol: auto
- Adding Method: Manual

Step Four: While your camera is still plugged into your main network (not the NVR), log into the camera using the CamViewer software and visit the network settings. Change the following credentials:
- IP Address: Change this to the IP address from step three.
- Gateway: 192.168.254.1
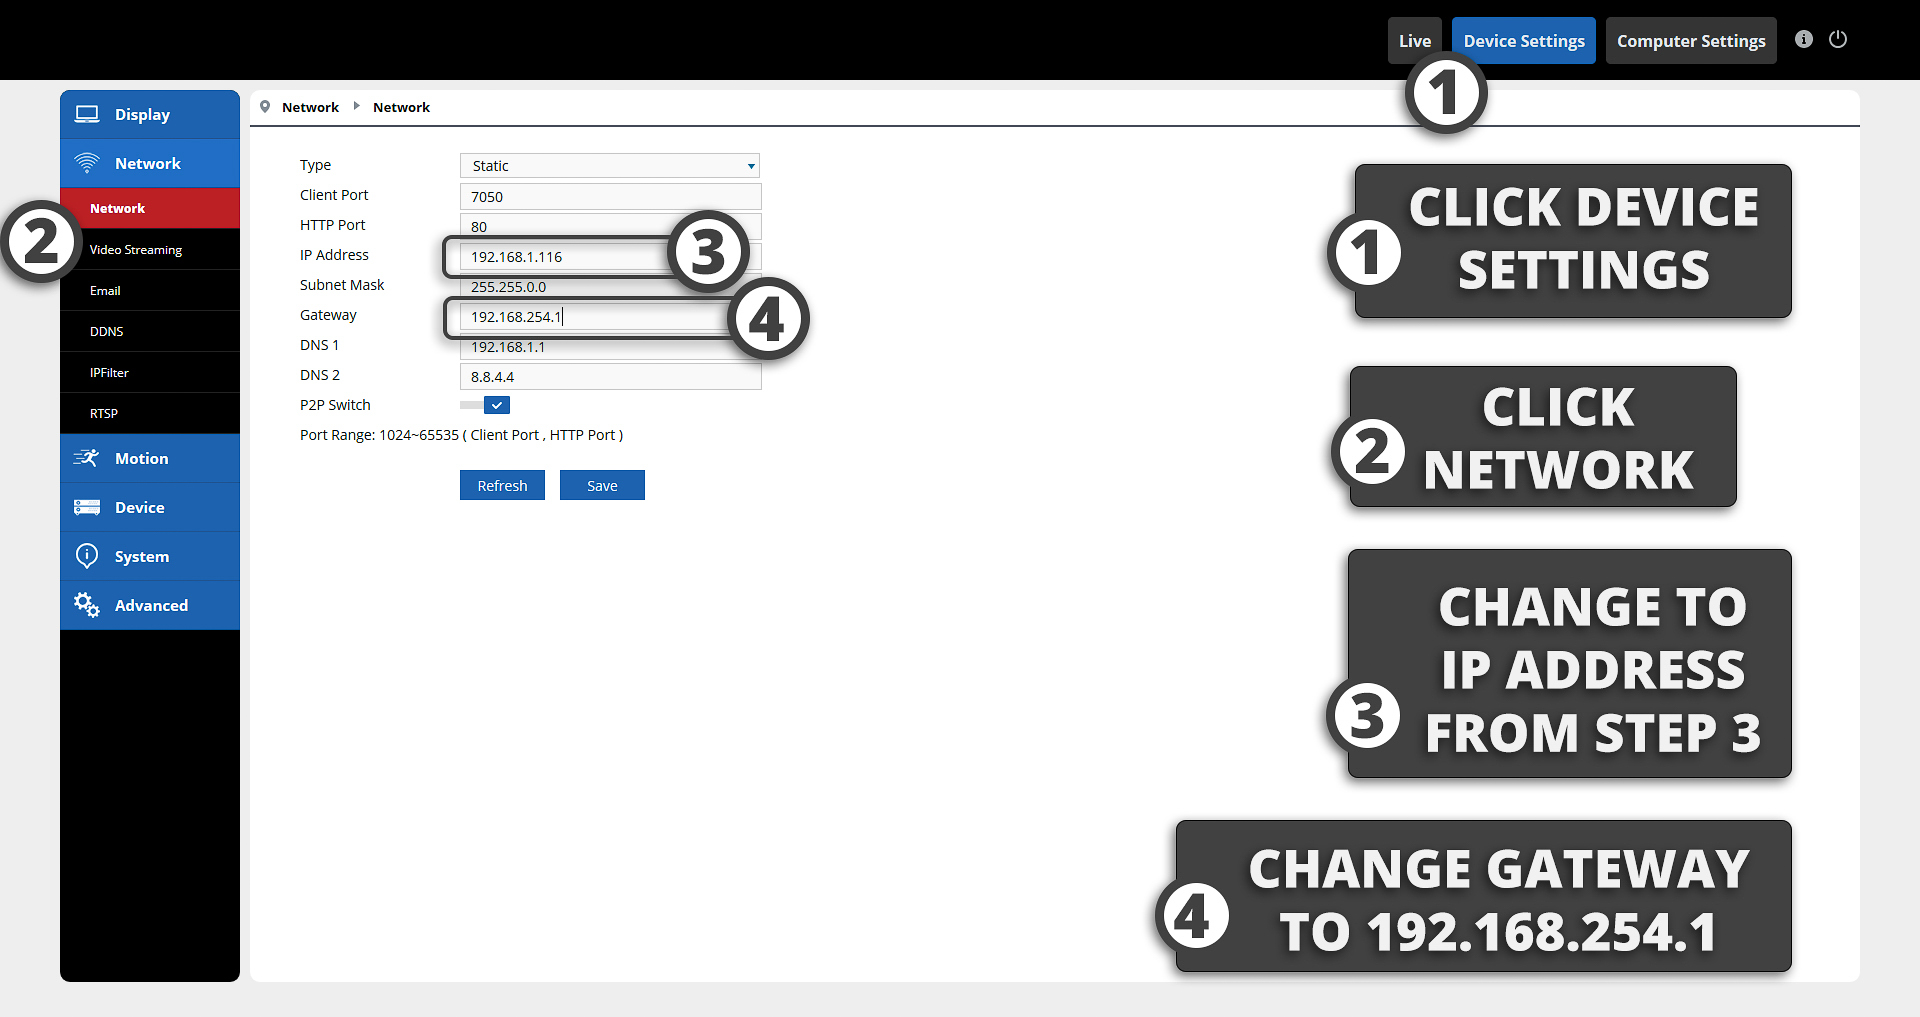
Be sure to click Save when done.
Step Five: Plug your camera back into the NVR and be sure to plug it into the port that coincides with the channel you configured back in step 2.
Wait a couple of minutes for the camera to boot up and you should see your camera on the NVR.
Dahua NVR Integration
There are two different methods you can use to connect your R-Series camera to a Dahua NVR. It depends on how you have it wired.
Your Camera is Connected to a Switch that is Separate from the NVR:
Step One: Open up your CamViewer software and navigate to the network settings under device settings.
Change your IP network type to "Static." Also while you're here, take note of your camera's IP address, as you will need this whenever you enter it into the Dahua NVR.
In our example, we'll take note of the IP address 192.168.1.77.
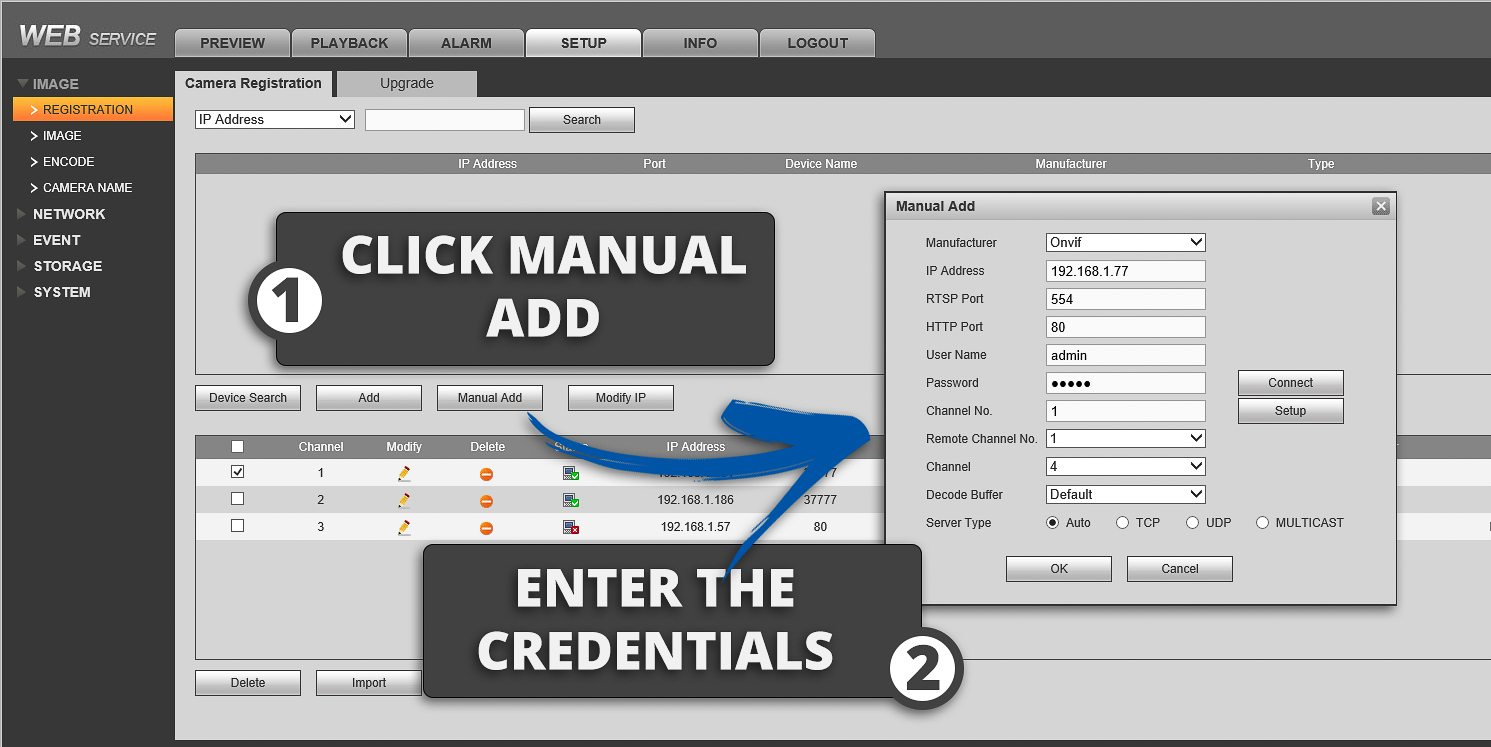
Step Two: Log into the Dahua NVR web interface. Under "Setup" and "Registration," click "Manual Add." Enter the following credentials and be sure to click save.
- Channel: Desired channel.
- Manufacturer: ONVIF
- IP Address: Enter camera's IP address from Step 2.
- Port: 80
- User Name: admin
- Password: admin
Congrats! You should now see your R-Series camera on the NVR.
Your Camera is Connected Directly to the POE Switch Built Into the Back of the Dahua NVR:
If you already have your camera plugged into the back of the NVR, temporarily remove it and plug it back into your main network via your router or a separate switch.
Step One: With your camera unplugged from the POE NVR and plugged directly into your network through a router or separate switch, log into the camera from the CamViewer software and navigate to the network settings.
From here you will change the IP address to 10.1.1.200
If you are adding multiple cameras, be sure to increase the last number by 1. (10.1.1.201, 10.1.1.202, etc.)
Change the gateway to 10.1.1.1. Finally, click Save.

Step Two: Now you can remove the camera from your main network switch or router and plug it directly into the back of the Dahua NVR's POE ports.
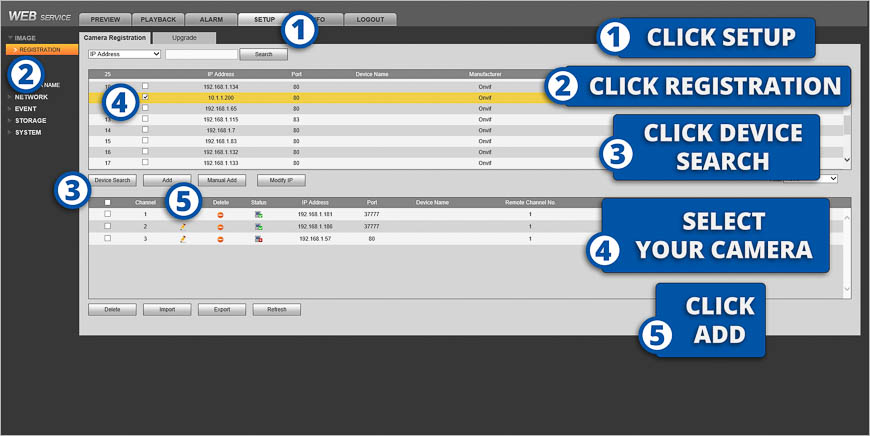
Allow two minutes or so for the camera to boot back up. Visit the Dahua NVR's web interface, specifically the camera Registration Page.
Click on Device Search. You should now see the R-Series camera's IP address listed.
Checkmark the box and click Add:

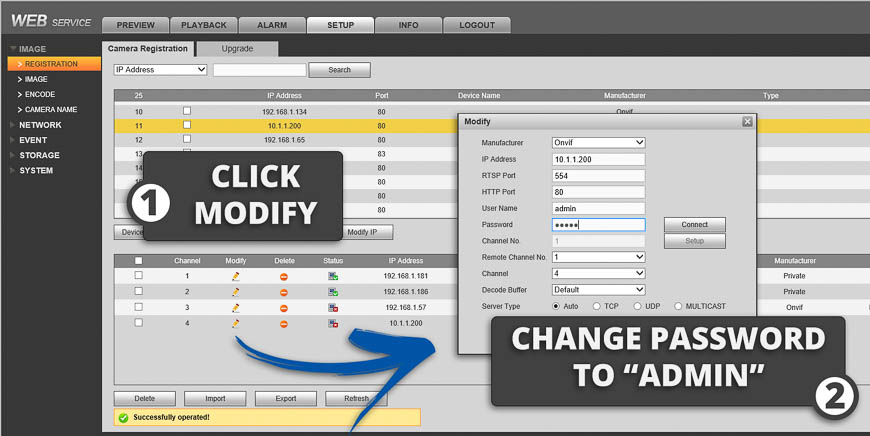
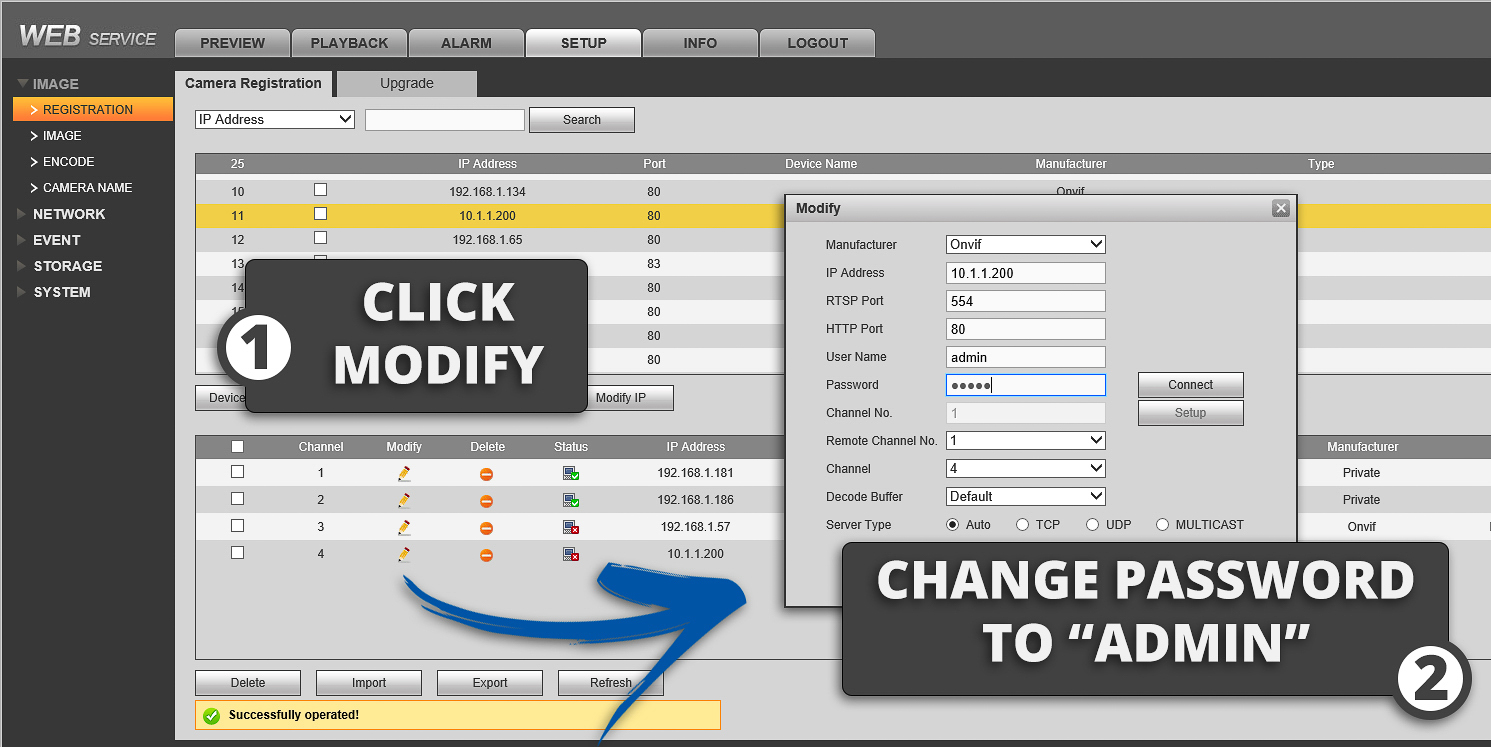
Step Three: It should now be added to the list of cameras. Now click "Modify."
Step Four: Change the camera's password to match your R-Series camera's password. By defualt it is: admin
Congrats! You should now be able to see your R-Series camera on your Dahua NVR.